
| Socket Style: | Slot 1 |
| Chipset: | i82440LX |
| Cache: | N/A (On Chip) |
| Form Factor: | ATX |
| BUS Speeds: | 66 / 68 / 75 / 83 MHz |
| Clock Multipliers: | 3.0x / 3.5x / 4.0x / 4.5x |
| Voltages Supported: | 1.5v - 3.5v (Auto Detect) |
| RAM Slots: | 4 168pin DIMM Slots (EDO/SDRAM) |
| AGP/PCI/ISA Slots: | 1 AGP Slot 4 PCI Slots 3 ISA Slots (1 Shared / 3 Full Length) |
| BIOS: | AWARD PnP BIOS |
| PCI EIDE Controller: | Super I/O 2 EIDE Channels 1 FDD Channel 2 Serial /1 EPP |
Have you ever heard of Zida? Most likely not, I hadn't heard about the company until they contacted me about testing a few of their motherboards. The company is apparently quite popular in Asia, and not being one to turn down an interesting offer as the one they presented me with I decided to go ahead with the review on the motherboard...was it worth my time? Yes.
Featuring 4 DIMM slots the 6MLX does seem to do what some larger manufacturers have overlooked, provide the user with actual expandability options. Since very few users have 128MB SDRAM DIMMs lying around it is quite popular to use a few 32MB DIMMs in conjunction with each other to obtain a system memory size of 64 or 128MB, and with the 512MB cacheable memory area of a single Pentium II processor you will have no problem meeting those limits when you're working with the 6MLX. Like most Pentium II boards the 6MLX supports up to 512MB of SDRAM and 1GB of EDO, however, as mentioned above, a single Pentium II will only cache 512MB of RAM so anything above that will provide you with a nice little performance hit of about 5 - 10% when using memory above the 512MB cacheable limit.
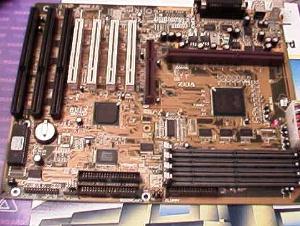 |
Moving on to the layout of the 6MLX, Zida decided to outfit their flagship motherboard with 4 PCI slots, 3 ISA slots and the ever so popular AGP slot, a key function of the Intel LX chipset - AGP support. For the most part the ATX layout of the 6MLX is quite common in the market compared to the other motherboards out, nothing really spectacular here. An interesting feature Zida decided to include with the 6MLX is an on-board Power LED that indicates if any power is being supplied to the motherboard. Now you may be thinking that an on-board Power LED on a motherboard is a waste of space and money, however it provides an excellent way of quickly diagnosing a dead motherboard...if the red indicator doesn't illuminate when connected to an ATX power source check the power supply and its connections or check the motherboard, no tech support calls here, just an easy to use diagnostic tool (not what you would expect from a $0.10 LED). Now, although highly unlikely, if the LED has a manufacturing defect then you're pretty much out of luck, let's just hope that Zida springs for the more expensive $0.15 LED's instead of the cheap imitations =) |
| The test system the Zida 6MLX was installed in didn't show any problems at all with the installation, upon starting the system for the first time a quick configuration of the AMI BIOS was necessary in order to get everything working properly. The look and feel of the classic AMI BIOS Setup is quite reminiscent of the horrid Phoenix BIOS Setup used in most store bought systems, however its flexibility and versatility, regardless of whether you are a beginner or a novice, comes in handy nevertheless. | 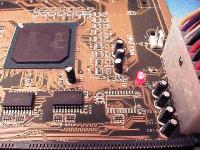 |
The 6MLX uses Zida's own patented TomatoBoard technology (now THAT is a name!), basically it is Zida's version of ABIT's prominent SoftMenuTM Jumperless CPU Setup technology. By choosing the CPU Configuration option in the AMI BIOS Setup you can configure your CPU's clock speed, provided that your 6MLX features a fully enabled TomatoBoard setup. The best feature of this TomatoBoard setup is a single option under the CPU Configuration menu item entitled: System Clock Over Clocking. As you may be able to tell by the name of this particular setting it allows you to Overclock your CPU, but not as you would expect. The CPU Speed setup option on the same screen only allows you to choose from a list of 4 pre-defined CPU clock speeds, 200, 233, 266, and 300MHz, which is great if you plan on running your CPU at one of those speeds. The 6MLX doesn't give you any option to choose your clock multiplier in the AMI BIOS Setup, so you have to do some simple math to figure out the clock multipliers each one of these settings will provide you with, for example the 200MHz setting will give you a 3.0x clock multiplier (66.6MHz bus x 3.0 = 200MHz). By enabling the System Clock Over Clocking item you are given the opportunity to change the Bus Speed your system is currently using, it allows you to select from all possible bus speeds on the 6MLX (66MHz - Disabled, 68.5MHz, 75MHz, and 83MHz)...not a bad approach to overclocking. Of course the 6MLX does feature the standard disclaimer in the CPU Configuration Setup: "Warning: Over clocking may cause system instability."
Zida's manual is more of an ATX reference guide than a motherboard manual, the 15 page document contains more information on the ATX specification than information on the actual setup and operation of the 6MLX, which is good for users that are familiar with building their own systems however not so beneficial for first time system builders.
Performance wise there is absolutely nothing to complain about with the 6MLX, its performance is on par with that of the top guns in the Pentium II - LX market, which is amazing considering the Zida name hasn't really been considered a threat to many manufacturers...maybe it should start to...
The biggest disappointment the 6MLX provided me with was that it wasn't a 100% jumperless motherboard, for some reason the jumper that allows you to enable/disable the Jumperless CPU Setup was hammered down on the test 6MLX reviewed here, meaning that the initial clock speed (200, 233, 266 or 300) must be set manually using a series of 4 jumpers located in a difficult to access area of the motherboard (between the Floppy Cable Connector and the Secondary IDE Cable Connector) especially if you have the board already installed in a case.
The 6MLX's manufacturing quality is one of questionable status, the lack of high quality Sanyo tantalum capacitors almost completely accounts for its inability to run the test Pentium II - 300 CPU at 375MHz (83 x 4.5), this isn't an important ability to many however since achieving that high of a clock speed with a 300MHz processor is quite difficult.
That's just about it for the downsides to the Zida 6MLX motherboard, of course with a company like Zida, you can never be sure about the technical support you will receive with their products, although judging from their Website it seems like you won't have to worry. Also a more comprehensive user's manual would have been nice, but I guess you can't have everything...
Auto-detects PnP Cards after HDD Detection
Allows user to manually set DMA Channels/IRQs to PnP cards or Legacy ISA cards
| ZIDA 6MLX Chipset Features Setup | |||
| Item | 66MHz Setting | 75/83MHz Setting | Safe Setting |
| EDO DRAM Speed (ns): | 50 | 60 | Auto |
| SDRAM Timing Latency: | Manual | Manual | Manual |
| RAStoCAS: | 2 Clks | 2 Clks | 3 Clks |
| RAS Precharge: | 2 Clks | 3 Clks | 3 Clks |
| DRAM Integrity Mode: | Non-ECC | Non-ECC | Non-ECC |
| PIIX4 Passive: | Enabled | Enabled | Disabled |
| PIIX Delayed Transaction: | Disabled | Disabled | Enabled |
| Fixed Memory Hole: | Disabled | Disabled | Disabled |
| VGA Frame Buffer USWC: | Enabled | Enabled | Disabled |
| PCI Frame Buffer USWC: | Enabled | Enabled | Disabled |
| USWC write I/O Post: | Enabled | Enabled | Disabled |
| AGP Aperture Size: | 64MB | 64MB | 8MB |
| AGP System Error Forwarding: | Enabled | Enabled | Disabled |
| AGP Parity Error Response: | Enabled | Enabled | Disabled |
| AGP Common SERR#: | Enabled | Enabled | Disabled |
This little addition to my review layout was put in here just so you all can have an idea of what brand of SDRAM I recommend and have tested with the board, just to avoid problems in the future if you decide to purchase the board.
Recommended SDRAM: Corsair SDRAM
SDRAM Tested: 1 x 64MB Corsair SDRAM DIMMs
Manufacturer: Corsair Microsystems
Purchase Web-Site: http://www.nf-ny.com/nfny/comp.html


0 Comments
View All Comments