Intel NUC11TNBi5 and Akasa Newton TN Fanless Case Review: Silencing the Tiger
by Ganesh T S on July 22, 2022 8:00 AM EST- Posted in
- Systems
- Intel
- Fanless
- HTPC
- NUC
- Passive Cooling
- UCFF
- Tiger Lake
- Akasa
Akasa Newton TN Noiseless NUC Build
The Akasa Newton TN comes in a nondescript brown box, with the only indicator of the contents being the small barcode sticker with the A-NUC63-M1B moniker on the side. The contents include the main chassis (which doubles up as the heat sink) and an user manual with installation instructions. The standoffs for the i7 Tiger Canyon NUCs come pre-mounted inside the main chassis. The i3 and i5 boards require these to be replaced with slightly different ones that are explicitly marked as being meant for this purpose. The pictures below bring out the miscellaneous components bundled in the package.
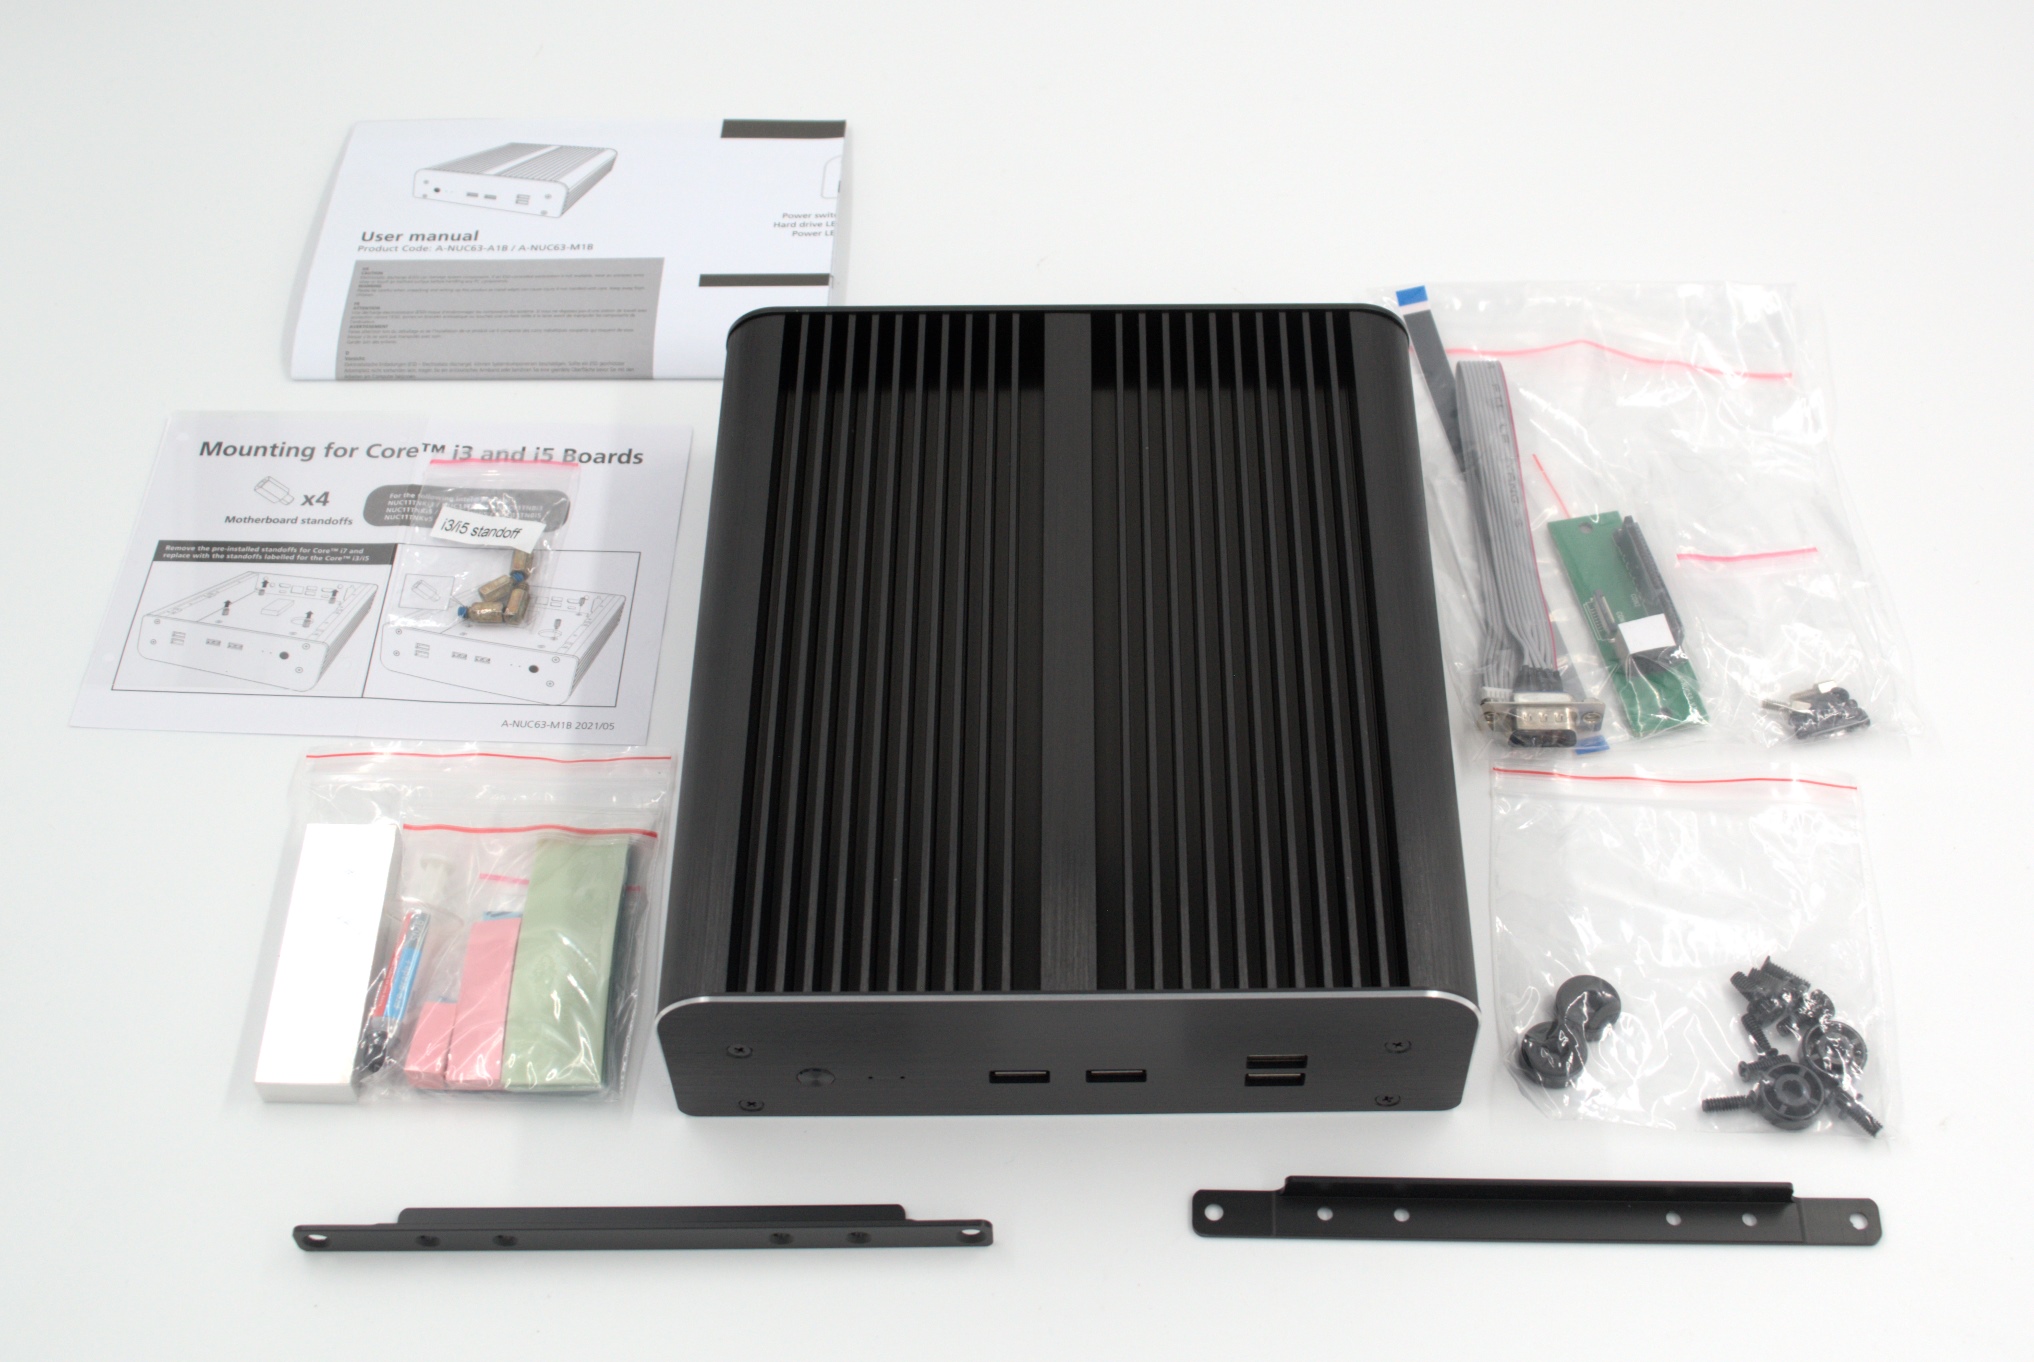

Starting from the top left corner in the above picture, we have:
- Akasa AK-TC5026 pro-grade+ thermal paste with a thermal conductivity of 2.9 W/mK.
- Thermal gap fillers to ensure contact between the VRM circuitry and the chassis / heatsink.
- Screws and washers to connect the motherboard and the standoffs
- EMI gaskets for mounting on the HDMI port receptacles
- Thermal gap filler pads and metal block (thermal module) to form the cooling solution for the M.2 2280 SSD
- Serial cable and mounting screws
- 2.5" drive mounting screws, mounting bracket, and transparent protective film for the drive
- SATA adapter board and cable to adapt data + power connector on board to the 2.5" drive's interface
- Screws to mount the 2.5" drive bracket to the chassis
- VESA mounting screws
- Case feet and associated screws
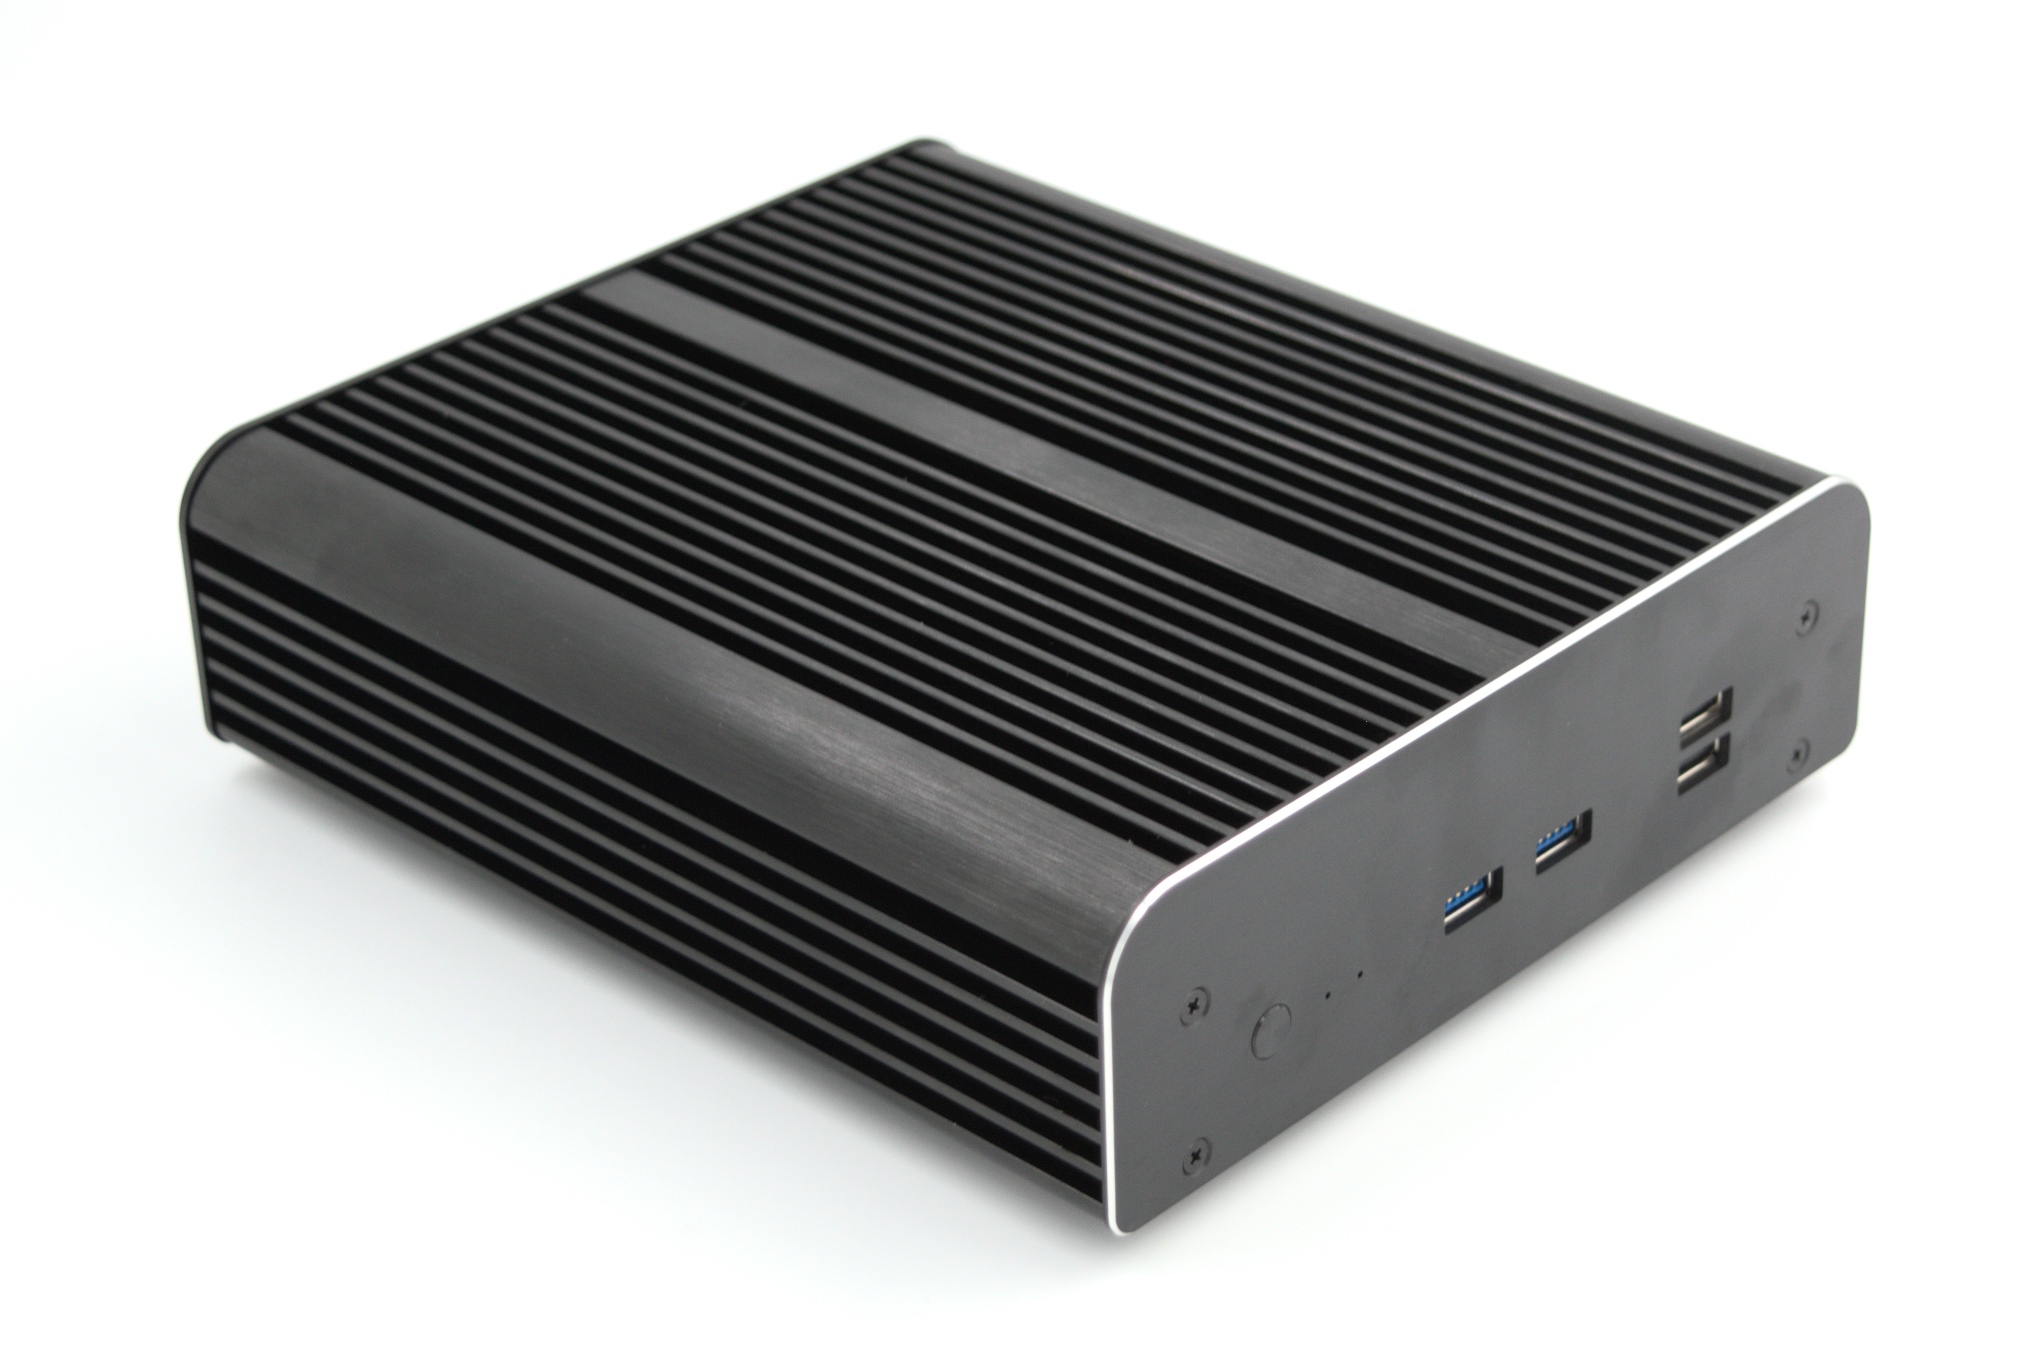
The gallery below includes photographs of the chassis from various angles. We see the front, bottom, and rear panels getting connected to the main chassis using screws that come pre-mounted. The core structure of the heat sink is evident at first look, with ridges / fins running all along the length of the unit. The middle segment is much thicker than the rest, and the long edges have a pleasing curvature (unlike the Turing). This design makes it much easier to handle the case without risking accidental cuts in one's hands and fingers. The ridges run along the sides of the case also. The underside of the case is completely flat and has the panel that can be unscrewed to install the motherboard.


The cut-outs in the front and rear of the main chassis tally with the I/O ports of the standard kit. However, Akasa has included a cut-out for a serial port in the rear panel and two USB 2.0 ports in the front panel.

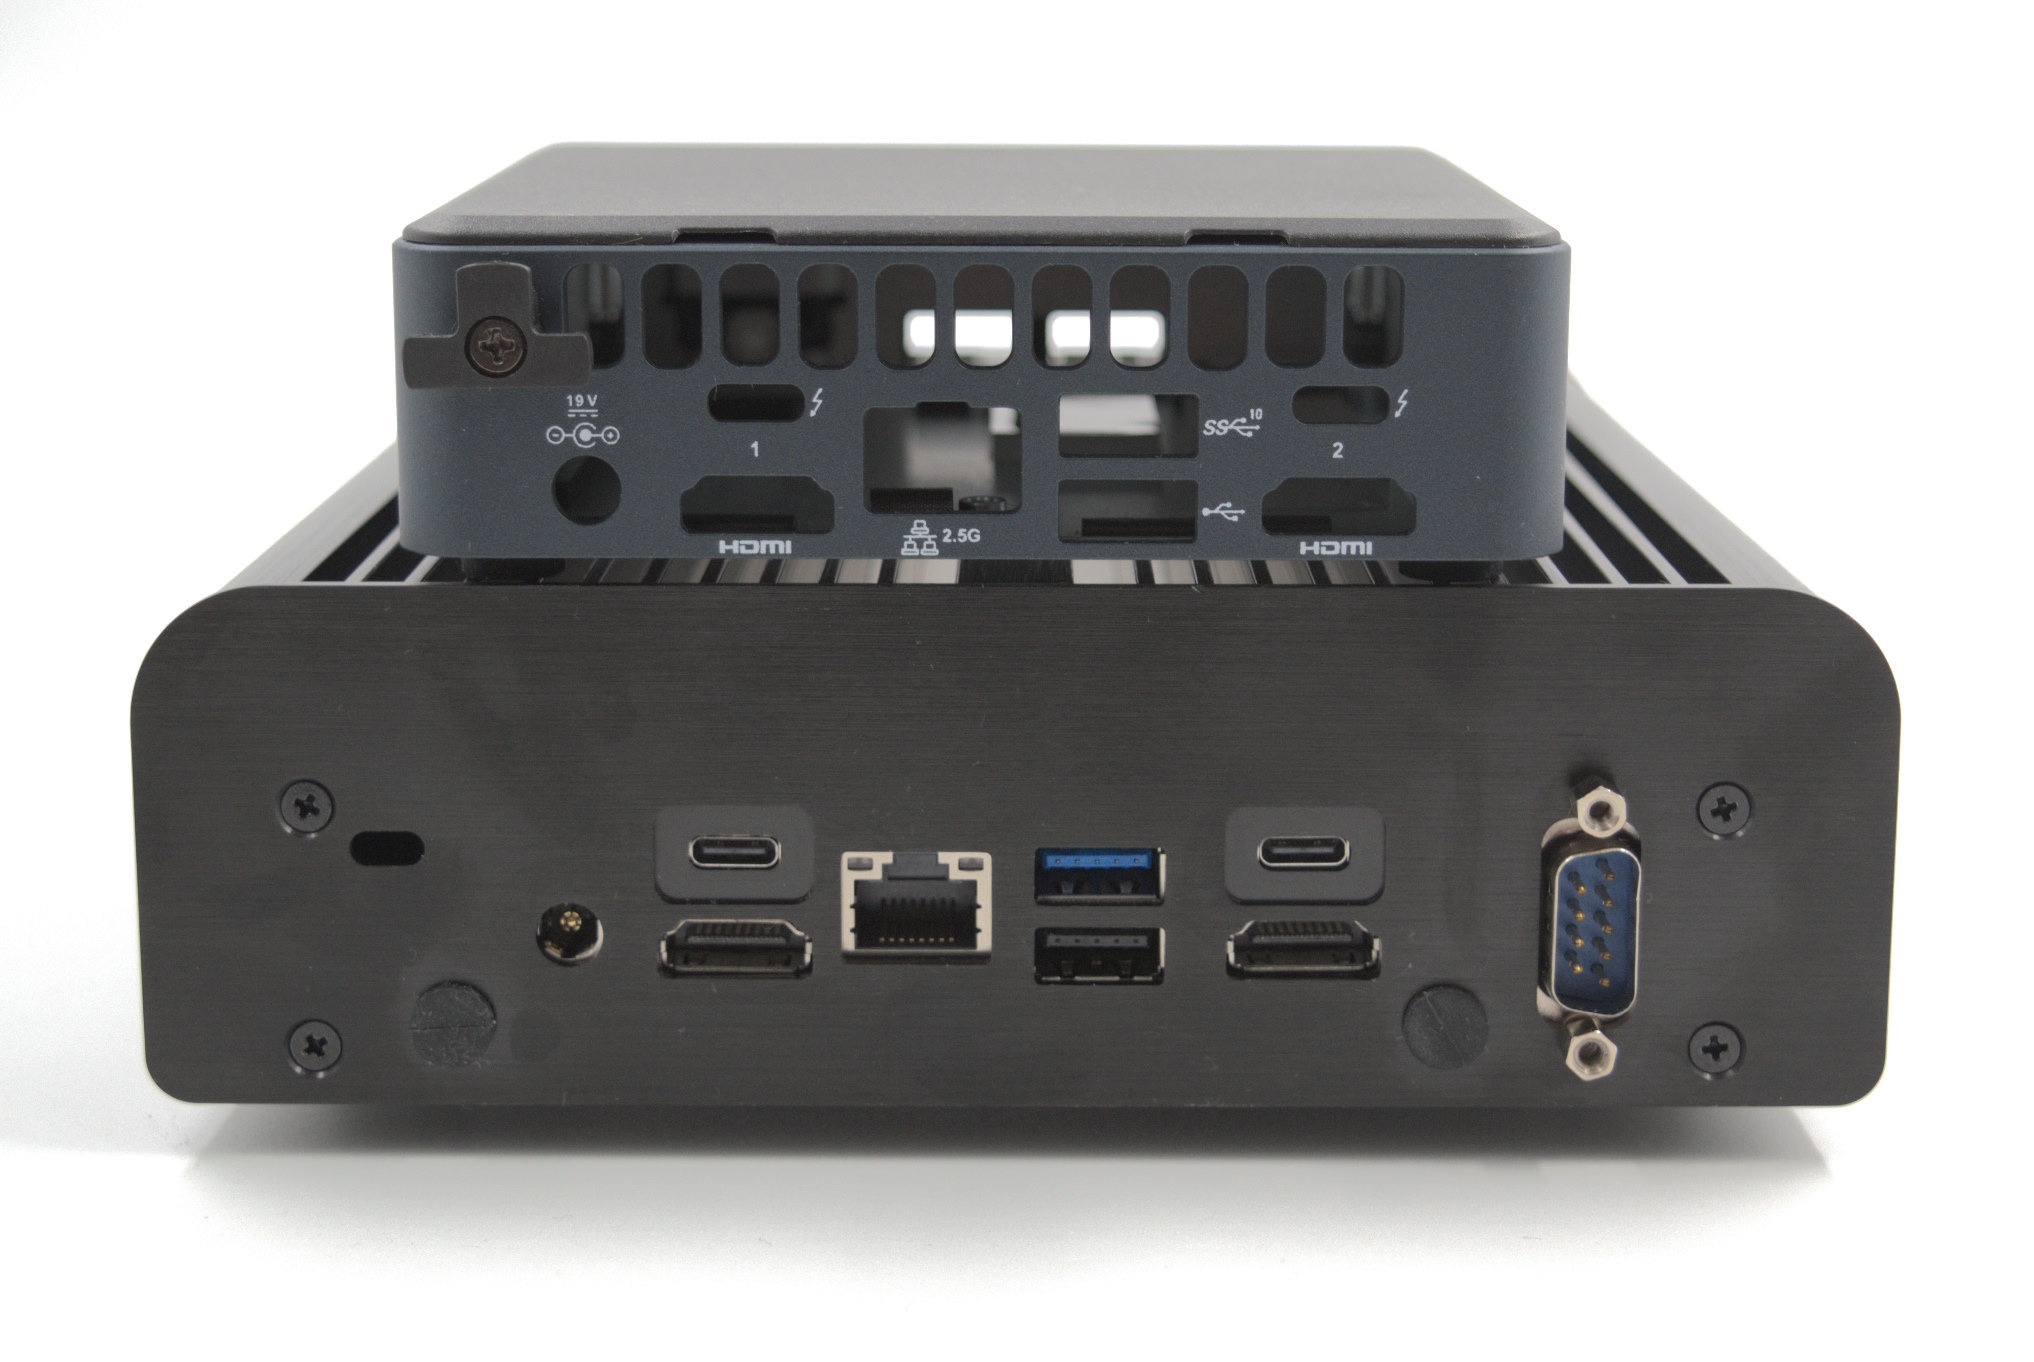
These functionalities are already present in the NUC11TNBi5 boards, but the standard kit keeps them unused. This is yet another advantage of the Newton over the corresponding Turing (whose I/O is restricted to what is provided by the standard kit). It should also be noted that the Thunderbolt Type-C ports in the Newton TN are slightly recessed, but that presented no issues even with 'bulky' Type-C devices like the Kingston DataTraveler Max (notorious for its width blocking nearby ports when connected to the system). The rear panel also has two antennae mounting holes for optional usage. By default, they are covered with push-in bumpers.
Unless one is starting off with the board version of the NUC, the standard NUC kit first needs to be subject to a teardown before starting the assembly with the Akasa Newton TN. The gallery below pictorially presents the teardown steps for the NUC11TNKi5.


The first step involves the removal of the kit's bottom panel. This reveals the thermal pads attached to the metal underside in order to cool down the M.2 drives, but that is not of concern in this particular task. The installed RAM and SSD are dismounted, with the holding screws retained in the standoffs for future use. Two screws that hold the board in place towards the rear I/O are taken out and kept aside safely. The main part is then turned around and the top panel removed by carefully pushing in the plastic tabs around the perimeter and pulling it up. The plastic frame and the inner metal enclosure are joined by four screws that are exposed after the top panel's removal. Once those screws are out of the picture, the motherboard can be gently prised out. The blower fan and the thermal gap filler across the exit's copper fins can be seen after pulling out the board and turning it around. In order to completely yank out the board, it is necessary to remove the pigtail antennae from the WLAN card. The antennae are attached to the inner metal frame, and can be safely stored for use elsewhere.
The next set of steps in the gallery below pictorially depicts the preparation of the motherboard for installation in the Newton TN chassis.


The blower fan is attached to the flat heat pipes and metal heat spreader by two screws and to the board itself using the fan power connector. The heat spreader itself is mounted using screws with holders at the corner of the Tiger Lake-U (TGL-U) package. Removal of the thermal solution assembly reveals the two dice (CPU and PCH) in the package bathed in thermal paste. The old thermal compound can be completely wiped away with the aid of rubbing alcohol.
The gallery below presents the preparation of the Newton TN chassis for the installation of the board prepared above. Unlike the Turing, only the bottom panel needs to be unscrewed. Inside the case, we see Akasa using three separate boards for servicing the front panel's features. A black wire set originates from the small board with the two USB 2.0 ports. This wire set terminates in two USB 2.0 header connectors. The two USB 3.2 Gen 2 Type-A ports are enabled by two USB 3.2 Gen 2 Type-A Male-to-Female adapter cables. The female end is permanently affixed to the second board. At the other end of the front panel boards set is the front panel header connector controlling the power switch as well as the power and drive activity LEDs. There is also a round recessed slot for the CMOS battery to slot it.


As mentioned in passing earlier in this section, the pre-mounted standoffs inside the case are meant for the i7 board. A lineman's pliers was used to remove the pre-installed ones, and the supplied Core i3/i5 standoffs were slotted in place. Between the standoffs, a solid raised metal block is in place to connect the TGL-U SiP to the rest of the massive heat sink doubling up as the chassis.
A pictorial representation of the remaining steps in the installation of the board in the Newton TN chassis is provided in the gallery below. Prior to placing the board inside the case, the thermal gap fillers are mounted on the VRM circuitry (inductors and MOSFETs) in a manner similar to how the original heat spreader assembly covered them. The supplied thermal compound is applied liberally over the two dice in the TGL-U package. The area meant for the board installation inside the chassis is cleared of wires, and the board is then placed upside down on the raised metal block - with the thermal compound-bathed package right on top of it, and the rear I/O elements aligned to the rear panel's cut-outs. Four specific screws with the red washers help secure the board to the standoffs installed earlier in the process. Unlike the Turing / Bean Canyon combo, there is no DMIC to worry about in this setup. However, the cables from the front panel boards need to be connected to the motherboard. Keeping the NUC11TN technical reference manual handy is helpful here to determine the locations of the front panel header and the USB 2.0 headers on the board (or, one can just take a look at the last picture in the gallery below). A bit of nifty cable management is necessary here, because the 2.5" drive assembly goes right on top of these cables and wires.


The Turing / Bean Canyon combo reviewed by us did not have any specific thermal solution for the NVMe SSD - but, having chosen a low-power WD SN500 in that build, we got away scot-free. The Newton TN, unfortunately, can't get away easily because the Tiger Canyon board includes support for a PCIe 4.0 x4 NVMe SSD (and most of them are notorious heat generators). Akasa has tried to address that aspect with a specific M.2 thermal solution - a metal block and two thermal gap filling pads. The plastic films covering either side of the thermal gap fillers were removed at the appropriate time during the installation process in the gallery below.


After placing the Samsung SSD 980 PRO in the slot, we placed the first thermal gap filling pad on top of the label, and the other pad across the metal block. The metal block was then positioned on top of the SSD + gap filler combination. The final plastic film on top was removed just prior to screwing in the bottom panel. The serial port adjacent to the SSD slot is connected to the serial cable, which is then mounted using screws slotting in from the outside to hold the serial port in place.
Our build does not utilize any 2.5" drive, but we still did a dry run of installing one just to get an idea of the steps involved in the process. The steps are brought out in the gallery below. The connector board is readied by attaching the flexible SATA connector cable carrying both power and data to it. In parallel, the 2.5" drive is attached to the mounting bracket with the protective film in place to prevent direct contact between the drive and the bracket at the connecting points. The SATA connector board is attached to the SSD, while the flexible connector cable's other end slots into the SATA port behind the M.2 2242 slot. The bracket is them attached to the main chassis, running right on top of the USB Type-A cables, as shown in the gallery below.


The final set of steps in the assembly process relate to the re-attachment of the bottom panel. Users expecting to VESA mount the system can use the same screws that held the panel in place originally. For flat placement, Akasa supplies case feet with appropriate screws that slot into the same holes. We opted for the latter configuration, as shown in the gallery above.
Overall, the build process was quite smooth - in fact, much easier compared to the Akasa Turing because of the space available inside the case. Folks used to building PCs from scratch will find it quite easy, while less experience folks can easily get by with the installation manual and detailed write-ups similar to the one above. The supplied manual assumes that users are starting off with the NUC11TNBxx boards, and does not include disassembly instructions for the original kit. We have addressed that in the above description.


18 Comments
View All Comments
deporter - Friday, July 22, 2022 - link
Thanks for the review!Indeed, if you want to cool that kind of power without any throttling, you simply need a bigger mass of metal. Still, it's not so bad and probably good enough for most use cases.
deil - Monday, July 25, 2022 - link
A little sad its throttling, it's very close to sustaining it while new and clean, it might become choppy and slow soon, when tiny amount of dust will get in. especially in SFF, I prefer machines that don't go beyond 80'CyankeeDDL - Wednesday, July 27, 2022 - link
I use a laprop with Tiger Lake as my daily driver for work. Company policy is Intel-only.It is a hot mess, drains the battery and it is definitely not zippy. I have a 4800HS at home that runs circles around it.
74W at the wall. And it is half as fast as a 4800U in multithreaded apps. With TL Intel is not even in the same ballpark as AMD. Gen 12 seems a huge improvement. Perhaps Gen 13 will catch up.
ganeshts - Wednesday, July 27, 2022 - link
I am curious from a benchmarking suite perspective - what are the multi-threaded apps that you are using? CPU-based rendering like Cinebench etc., obviously benefits - but no one is seriously going to use a TGL-U system for that purpose. I do see MT performance benefiting compression and decompression using 7-Zip. Anything else?Calin - Thursday, July 28, 2022 - link
Corporate computers run a _lot_ of software that is not present on home computers. Also, their startup sequence is more complex due to the integration into Active Directory (adding extra startup steps).Not to mention that you might have a transparent VPN installed that send data through the company network, which slows down otherwise fast "internet" actions.
So, you're comparing apples and oranges.
TensorVortex - Friday, July 22, 2022 - link
Yah there are some router on aliexpress with i5 or i7 11th gen fanless that cost the same or cheaper than this. I bought one and was running it at 70C fanless, and a filter cap blown, and the high side mosfet also burnt through… bought new mosfet, contacted support to get the spec of the filter cap, apparently they are using L5V rating caps, no wonder it blowns in a fanless case…. I have replaced the cap with X5R cap, and running a fan to cool it down now…t.s - Friday, July 22, 2022 - link
For box that small, > 70 watt is insane.Ryan1981 - Saturday, July 23, 2022 - link
I have an Intel NUC 8 Rugged Kit NUC8CCHKR, I've tried the Zotac CI331 Nano, both fanless but not "noiseless"! I wanted these as a bedroom HTPC that I can leave on in the night for smart home purposes and the convenience of not having to wait till it's booted and ready to go but I ended up having to turn it off because while there is no fan noise, the electrical noise coming from these PC's is audible at night and disrupting my sleep. No major issue for me since it was a test but when I see this article claiming it is noiseless, I strongly suspect it is in fact not, and I'd feel it should be included in the testing. In fact I'd feel this is an underestimated topic to have bedroom appliances like clocks, phone chargers and nowadays smart lights etc. that do not make some form of electrical noise (speficially high pitched ones).ganeshts - Saturday, July 23, 2022 - link
I have observed the issue in a couple of fanless mini-PCs.. like the one reviewed here:https://www.anandtech.com/show/14157/zotac-zbox-ci...
I had observed this issue in some of the fanless Zotac PCs I had reviewed back in 2016 too. I think the problem actually may vary from sample to sample - I also reviewed the CI662 nano with pretty much the same board, but just a newer CPU - and that didn't have the problem.
It has probably got to do with some particular board component choice.
I am surprised about the Chaco Canyon, though. Usually, Intel's board components are top-notch.
abufrejoval - Saturday, July 23, 2022 - link
I got tons of equipment in the room where I also sleep.And I remember being bothered by a high pitched noise when things quietened down at night, that was hard to pinpoint. I tried using a spectroscope app on the smartphone to identify where the high pitch was coming from, too. I wound up really ripping out everything connected to the power lines, but no luck.
Eventually it dawned on me that I have tinnitus...